running docker container as non-root

one common misconception is that containers provide a secure and isolated environment and therefore it’s fine for processes to run as root (this is the default). I mean, it’s not like it can affect the host system right? Turns out it can and it’s called “container breakout”!

dalle2 container breakout

with containers, you should also apply the principle of least privilege and run processes as a non-root users. This significantly reduces the attack surface because any vulnerability in the container runtime that happens to expose host resources to the container will be less likely to be taken advantage of by a container process that does not have root permissions.

here’s a rough skeleton of how you can do this by using the USER directive in the Dockerfile:

# Create a non-root user named "appuser" with UID 1200
RUN adduser --disabled-password --uid 1200 content

# Set the working directory
WORKDIR /app

# Grant ownership and permissions to the non-root user for the working directory
RUN chown -R appuser /app

# Switch to the non-root user before CMD instruction
USER appuser

# ... install app dependencies ...
# this may involve copying over files and compiling

# Execute script
CMD ["./run"]
Code language: PHP (php)

one thing worth mentioning in this example is permissions.

we use the USER instruction early on right after we change the ownership of the working directory. since this is happening before we enter the application building phases, it’s possible that the permissions of the user appuser is insufficient for subsequent commands. For example, maybe at some point in your docker file you need to change the permission of a file that appuser doesn’t own or maybe it needs to write to a bind-mounted directory owned by a host user. If this applies to your situation, you can either adjust permissions as needed prior to running USER or move USER farther down towards the CMD instruction.

generally speaking, it’s also good practice to ensure that the files that are copied over from the host have their ownership changed to appuser. this isn’t as critical as ensuring that the process itself is running as non-root via USER since if an attacker gains privileged access, they can access any file in the container regardless of ownership. nonetheless it’s a good practice that follows the principle of least privilege in that it scopes the ownership of the files to the users and groups that actually need it.

other resources if you’re interested in learning more about this topic:

  • https://medium.com/jobteaser-dev-team/docker-user-best-practices-a8d2ca5205f4
  • https://www.redhat.com/en/blog/secure-your-containers-one-weird-trick
  • https://www.redhat.com/en/blog/understanding-root-inside-and-outside-container

iPhone SE (1st Gen 2016) Battery Replacement

I bought my current refurbished iPhone SE back in August 2018. It’s my favorite phone by far and I have no plans on getting a new phone. There’s a second gen SE that was released in 2022 that’s slightly bigger with a 4.7inch screen that I may consider getting in the future, but I really prefer a smaller phone and the original SE is the last iPhone from Apple to have a 4 inch screen. Last year (2022) the battery life started giving me trouble because it was losing 8-10% every hour just by having Bluetooth on.

Since it’s a refurbished phone that was over 4 years old at that point I figured it would be nice to try to replace the battery myself. If I screw up terribly I won’t feel too bad about getting a new phone and if it works out I’ll be able to squeeze maybe a few more years out of this thing.

My ebay purchase back in 2018

Anyway I ended up doing it and I’m fine. Nothing exploded. My wife has the same model so I ended up replacing her battery as well and so far the phone works just like new. Here are the resources I used and tools I purchased to do this – I’ll also include some notes at the end based on my experience.

Videos

Longish video that I followed step by step

Here’s a shorter video that I used as an additional reference.

Purchases

I bought this all in one battery and repair tool kit from Amazon that worked out pretty well. I didn’t have the special Apple screw drivers and buying the kit and battery separately was more expensive so I recommend this if you’re doing it for the first time and don’t want to worry about whether you have everything you need.

If you just want to know what the essential parts are:

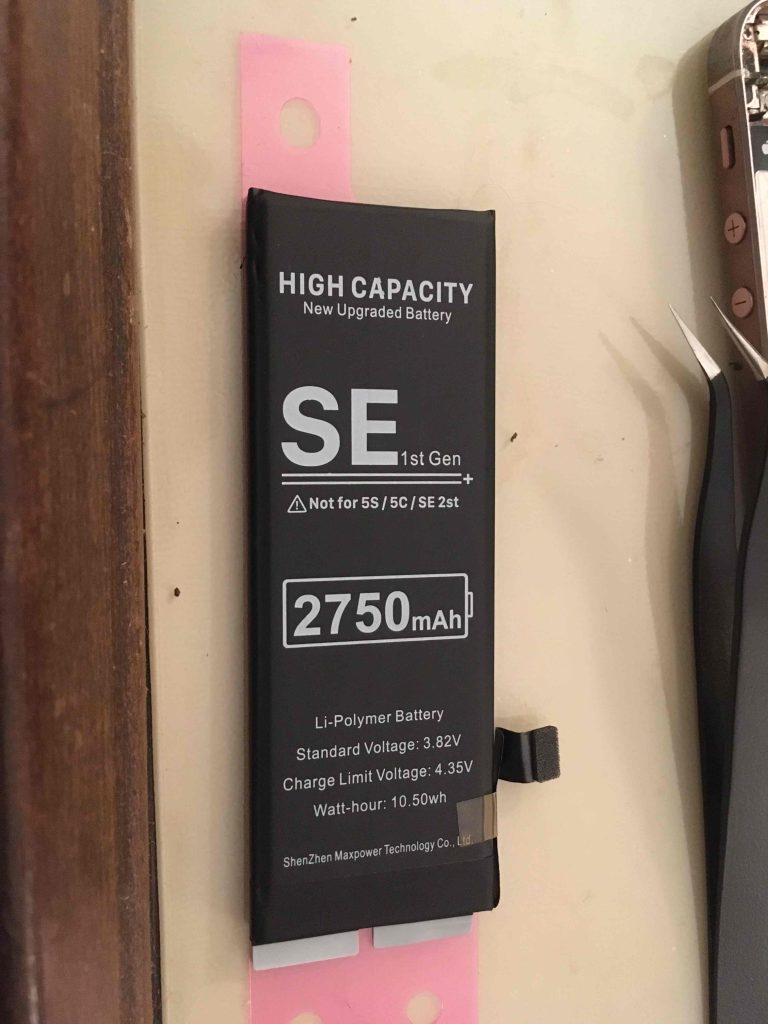
  • PAISUE iPhone Replacement Battery for iPhone A1662. A1662 is the official US model for the SE but it also goes by A1723 and A1724 in other countries (you should double check this).
  • Battery adhesive. This usually comes with the new battery – you’ll need it to replace the existing adhesive that’s holding the battery to the phone.
  • Suction cup for removing the screen frame. It’s pretty tricky to lift the screen off initially without some sort of suction tool…
  • Pentalobe screw driver for those special Apple screws.
  • A small prying tool. The kit comes with this plastic triangle pick that I used to pry open the screen. Not super necessary since you can make use of plastics you already have like credit cards.

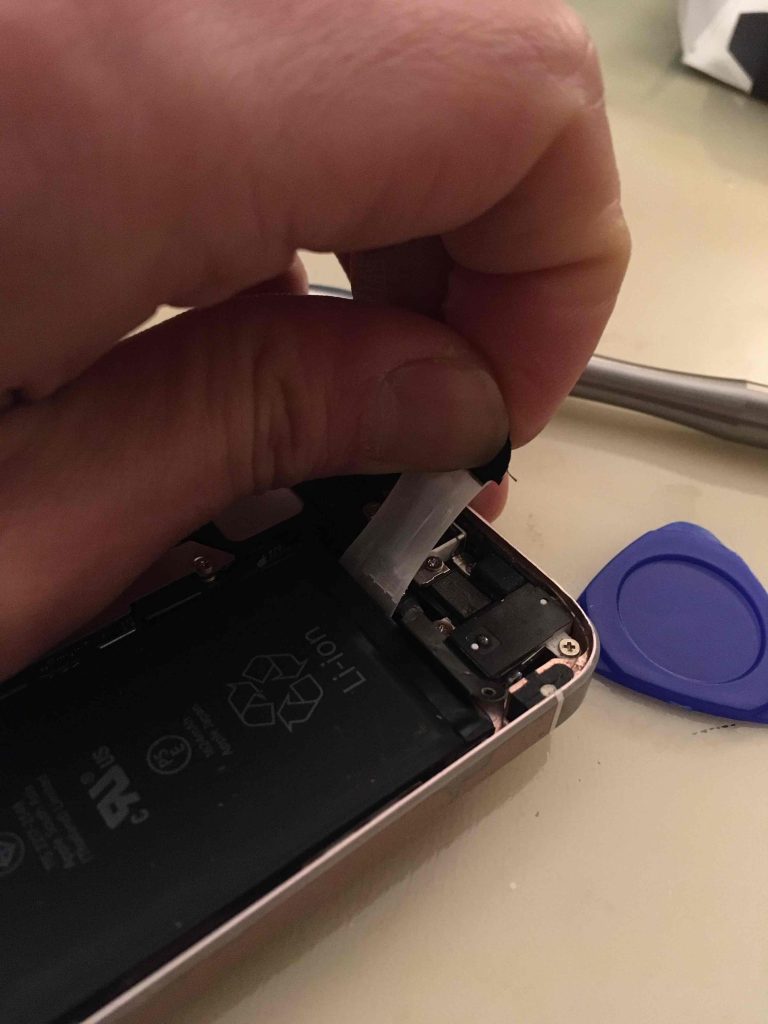
Some images from my repair

Tips

  • The screen consist of two parts – make sure you lift up the entire frame of the screen and not just the screen itself. If you’re doing it right you’ll see the face of the battery underneath.
  • The videos all make the adhesive removal look easier that it is. Both times I broke the adhesive either immediately or midway. Go VERY slow with the adhesive because it’s so much harder to remove the battery once it breaks. I highly recommend using some sort of warming mat to soften the glue (I used a low-heat coffee warmer the second time around and it went much smoother). The first time I did this and the adhesive broke, I ended up prying the battery (not ideal, but I felt I could do it safely since most of the adhesive had been removed). I would really just go as slow as you can because seriously if it breaks you’re like doubling your repair time.
  • Make sure you lay out the various parts and screws in order and keep track of how they’re going back in. There’s at least one place holding the screen in place that has 4 tiny screws of different sizes – the first time I did it I lost track and wasted some time trial-and-erroring my way with the tiny screws.

Good luck and be safe.

Python Dependency Inversion Principle

What does dependency inversion mean or look like in the context of a dynamically typed language like Python? First we’ll review the concept of dependency inversion and what it means in a statically typed language like Java. Then we’ll compare the differences in dependency inversion between the two types of languages.

Note: Robert C. Martin originally introduced this term and while I’m not certain I think it likely came out of the java world because I can’t imagine pythonistas or rubyists coming up with such a grandiose word for what is ultimately a fairly simple and specific means of indirection 🙂

Dependency Inversion

According to wikipedia, the dependency inversion principle states that:

  • High-level modules should not depend on low-level modules. Both should depend on abstractions (e.g. interfaces).
  • Abstractions should not depend on details. Details (concrete implementations) should depend on abstractions.

Put another way, it’s saying that if a component needs to be able to switch specific implentations (details), it should not have a source code dependency to those implementations.

By removing the source code dependency and replacing it with a dependency to an interface, you are “inverting” the depedency between the high level component and the low level details.

But that’s all very theoretical mumbo jumbo so lets look at some concrete examples.

Java

In java, this is an example without dependency inversion.

class Cat {
    public void greet() {
        AngryGreeter greeter = new AngryGreeter();
        greeter.greet();
   }
}Code language: JavaScript (javascript)

The Cat class is our component here. It is directly referencing the class AngryGreeter which contains the specific details of greeting.

In many cases, this source code dependency runs in the same direction as the flow of control. In other words, if Cat needs to invoke methods on instances of AngryGreeter, it needs to have a reference to a concrete greeter object and the most common way to do that is to just use the new keyword to construct the object where it’s needed.

The consequence of this relationship through this construction using new AngryGreeter is that it creates tight coupling between the two modules. More specifically, our Cat class now directly depends on the concrete greeting class AngryGreeter.

Now, if there is no need to add new greeting behaviors at all, this relationship is perfectly fine.

But if we want to add new behaviors such as a HappyGreeter, we would have to modify Cat. Taken to the extreme, if we needed to add 100 greeting behaviors over the course of 100 days and we wanted Cat to be able to perform all of them, we would have to change Cat 100 times!

To avoid that, we need to:

  1. Introduce an interface that concrete greeters impelement
  2. Pass concrete greeters as arguments into Cat (dependency injection)

Here’s what dependency inversion looks like in Java for this simple example:

public interface Greeter{
    void greet();
}

class AngryGreeter implements Greeter { 
    public void greet() {
        System.out.println("YOWL!");
    }
}

class Cat {
    private final Greeter greeter;
        
    public Cat(Greeter greeter) {
        this.greeter = greeter;
    }

    public void greet() {
        this.greeter.greet();
    }
}
Code language: PHP (php)

Now, rather than Cat depending directly on AngryGreeter, both Cat and Angry greeter depend on the interface Greeter.

What we have now is a dependency that points in the opposite direction of the control flow, hence it’s inverted.

Now, we can add new greeters to our system without ever touching the Cat component. That’s pretty sweet. Previously, Cat had a direct, hard coded reference to AngryGreeter. Now it has a direct reference to the interface instead which will only change when the greeting API changes (and not when new greeting behavior that uses the same API is added).

Python

Now lets look at the first example implemented in Python:

class AngryGreeter:
    def greet(self):
        print("YOWL!")
class Cat:
    def greet(self):
        greeter = AngryGreeter()
        greeter.greet()

Since python is dynamically typed, there is no need to declare an interface the source code in the same way as Java. At run time, objects either can do something or they can’t.

Therefore, if we wanted to invert the dependencies, we can turn the direct reference to the object into a parameter:

class AngryGreeter:
    def greet(self):
        print("YOWL!")
class Cat:
    def greet(self, greeter)
        greeter.greet()Code language: CSS (css)

While this is easy to do in python (or any dynamically typed language), there is one glaring drawback when we do this: we don’t know exactly what the interface is without looking at what methods are actually being called.

So while inverting dependencies are easy because interfaces are implicit, the implictness of interfaces means that:

  • Cat may crash if given a greeter object that does not implement the same interface. Missing method?
  • You need to spend a lot more time reading existing source code (mostly existing concrete classes) in order to infer what the interface is

This is one of the fundamental differences (and probably source of many divorces) between statically typed and dynamically typed languages. Given a dynamically typed language like python, can we add more reassurance?

There’s a couple of things you can do.

The first is type hints, which can be useful for your IDE but does not enforce contracts at runtime. The second is abstract base classes which will provide runtime checking.

Abstract Base Classes

Python 3 introduced ABC classes to solve these problems (these are more akin to javas abstract interfaces since they can contain implementation).

import abc

class Greeter(abc.ABC):
    @abc.abstractmethod
    def greet(self):
        pass

class AngryGreeter(Greeter):
    def greet(self):
        print("YOWL!")

class HappyGreeter(Greeter):
    pass

class Cat:
    def greet(self, greeter):
        greeter.greet()

if __name__ == "__main__":
    c = Cat()
    c.greet(AngryGreeter())
    c.greet(HappyGreeter())
Code language: CSS (css)

Now, you’ll get an exception when HappyGreeter is instantiated without the greet method. In terms of understanding what methods are expected, we don’t have to go digging through multiple classes – we can just look at the interface that the greeters implement.

Nand2tetris Python Assembler

Here’s my source code for the assembler for the nand2tetris HACK assembly language written in Python 3.

This implementation emphasizes readability above all else. Therefore, there are more function calls than necessary and many parts of the implementation assume valid inputs. It has been tested to work with all files provided in the course.

I hope this can serve as a useful reference for others.

import re
import sys
import argparse

def convert_assembly_to_binary_file(asm_file, binary_file):
    with open(asm_file, "r") as f:
        result = translate_lines(f.readlines())
        output = "\n".join([l for l in result if l]) 
        with open(binary_file, "w") as f:
            f.write(output)

def translate_lines(lines):
    lines = strip_whitespace_and_comments(lines)
    symbol_table = build_symbol_table(lines)
    translate_instruction = build_instruction_translator(symbol_table)
    return [translate_instruction(x) for x in lines]

def strip_whitespace_and_comments(lines):
    instructions = []
    for line in lines:
        stripped_line = line.strip() 
        if stripped_line:
            if not stripped_line.startswith("//"):
                if "//" in stripped_line:
                    instructions.append(stripped_line.split("//")[0].strip())
                else:
                    instructions.append(stripped_line)
    return instructions

def build_symbol_table(lines):
    symbols = {
        "R0": "0000000000000000",
        "R1": "0000000000000001",
        "R2": "0000000000000010",
        "R3": "0000000000000011",
        "R4": "0000000000000100",
        "R5": "0000000000000101",
        "R6": "0000000000000110",
        "R7": "0000000000000111",
        "R8": "0000000000001000",
        "R9": "0000000000001001",
        "R10": "0000000000001010",
        "R11": "0000000000001011",
        "R12": "0000000000001100",
        "R13": "0000000000001101",
        "R14": "0000000000001110",
        "R15": "0000000000001111",
        "SP": "0000000000000000",
        "ARG": "0000000000000010",
        "LCL": "0000000000000001",
        "THIS": "0000000000000011",
        "THAT": "0000000000000100",
        "KBD": "0110000000000000",
        "SCREEN": "0100000000000000"
    }
    is_address_instruction = lambda x: x.startswith("@")
    is_compute_instruction = lambda x: "=" in x or ";" in x
    label_value = lambda x: x.replace("(", "").replace(")", "").strip()
    current_line_num = 0
    for line in lines: 
        if is_address_instruction(line) or is_compute_instruction(line):
            current_line_num +=1 
        elif is_label(line):
            symbols[label_value(line)] = decimal_to_binary(current_line_num)
    base_address = 16
    for line in lines:
        if line.startswith("@"):
            value = line[1:]
            if value not in symbols and not value.isnumeric():
                symbols[value] = decimal_to_binary(base_address)
                base_address += 1
    return symbols

def build_instruction_translator(symbol_table):
    COMPUTATIONS = {
        "0": "0101010",
        "1": "0111111",
        "-1": "0111010",
        "D": "0001100",
        "A": "0110000",
        "!D": "0001101",
        "!A": "0110001",
        "-D": "0001111",
        "-A": "0110011",
        "D+1": "0011111",
        "A+1": "0110111",
        "D-1": "0001110",
        "A-1": "0110010",
        "D+A": "0000010",
        "D-A": "0010011",
        "A-D": "0000111",
        "D&A": "0000000",
        "D|A": "0010101",
        "M": "1110000",
        "!M": "1110001",
        "-M": "1110011",
        "M+1": "1110111",
        "M-1": "1110010",
        "D+M": "1000010",
        "D-M": "1010011",
        "M-D": "1000111",
        "D&M": "1000000",
        "D|M": "1010101"
    }
    DESTINATIONS = {
        "": "000",
        "M": "001",
        "D": "010",
        "MD": "011",
        "A": "100",
        "AM": "101",
        "AD": "110",
        "AMD": "111"
    }
    JUMPS = {
        "": "000",
        "JGT": "001",
        "JEQ": "010",
        "JGE": "011",
        "JLT": "100",
        "JNE": "101",
        "JLE": "110",
        "JMP": "111"
    }
    def fn(line):
        if is_label(line):
            return
        if line.startswith("@"):
            value = line[1:]
            if value in symbol_table:
                return symbol_table[value]
            return decimal_to_binary(int(value))
        dest, jump = "", ""
        comp = line.split("=").pop().split(";")[0]
        if "=" in line: 
            dest = line.split("=")[0]
        if ";" in line: 
            jump = line.split(";").pop()
        return f"111{COMPUTATIONS.get(comp, '0000000')}{DESTINATIONS.get(dest, '000')}{JUMPS.get(jump, '000')}"
    return fn

def is_label(line):
    return line.startswith("(") and line.endswith(")")

def decimal_to_binary(decimal_value):  
    return f"{decimal_value:0>16b}"

if __name__ == "__main__": 
    parser = argparse.ArgumentParser(description="Generates a hack binary file from assembly")
    parser.add_argument("asm_file", help="name of a HACK assembly file, i.e input.asm")
    parser.add_argument("binary_file", help="name of the HACK file, i.e output.hack")
    args = parser.parse_args()
    convert_assembly_to_binary_file(args.asm_file, args.binary_file)
Code language: JavaScript (javascript)

Here’s what a translation for the Project 06 Max program looks like:

Line Number Before After
0 @R0 0000000000000000
1 D=M 1111110000010000
2 @R1 0000000000000001
3 D=D-M 1111010011010000
4 @OUTPUT_FIRST 0000000000001010
5 D;JGT 1110001100000001
6 @R1 0000000000000001
7 D=M 1111110000010000
8 @OUTPUT_D 0000000000001100
9 0;JMP 1110101010000111
10 (OUTPUT_FIRST)
11 @R0 0000000000000000
12 D=M 1111110000010000
13 (OUTPUT_D)
14 @R2 0000000000000010
15 M=D 1110001100001000
16 (INFINITE_LOOP)
17 @INFINITE_LOOP 0000000000001110
18 0;JMP 1110101010000111

The full specification for the nand2tetris HACK machine language can be found in the Project 6 materials on the course website.

Let me know if you have any questions!

Practical Guide to Python String Format Specifiers

Python 3.x introduced two key enhancements to string formatting:

  • The .format method and format specifiers with PEP-3101 (Python 3.0)
  • f-strings or literaly string interpolation with PEP-0498 (Python 3.6)

In this article I’m going to give specific examples on how format specifiers work using both .format and f-strings.

Format specifiers give you much greater control over how you want your output to look, but the grammar can feel foreign and confusing if you’re coming from python 2 where the extent of most string interpolation just involved using % symbols.

I expect you to have a basic working knowledge of how to use .format and f-strings, but here’s a refresher:

Using .format:

>>> name = "John"
>>> age = 15
>>> print("{} is age {}".format(name, age))
John is age 15
>>> print("{1} is age {0}".format(name, age))
15 is age John
>>> print("{name} is age {age}".format(name=name, age=age))
John is age 15
Code language: PHP (php)

Using f-strings:

>>> name = "John"
>>> age = 15
>>> print(f"{name} is age {age}")
John is age 15
Code language: PHP (php)

Now lets dig into format specifiers.

Format Specification

Here’s the grammar of a format specifier: [[fill]align][sign][#][0][width][grouping_option][.precision][type]

The official documentation on format specifiers does a great job explaining the meaning of each aspect of the format specifier grammar so I won’t repeat that here. I highly encourage you to read through the documentation on what each part of that grammar means first.

Lets start with 3 strings:

item_number = "103"
item_label = "Light Saber"
item_price = "256.128"
Code language: JavaScript (javascript)

Every example will be accompanied by a use of both .format and f-strings. First, here’s a normal, default output without any format specification:

>>> print("{}, {}, {}".format(item_number, item_label, item_price))
103, Light Saber, 256.128
>>> print(f"{item_number}, {item_label}, {item_price}")
103, Light Saber, 256.128
Code language: PHP (php)

Now I will progressively add format specifiers.

Again, here’s the full grammar of a format specifier: [[fill]align][sign][#][0][width][grouping_option][.precision][type].

Lets start with [[fill]align].

[[fill]align]

Lets make our item number take up a width of 50 characters:

>>> print("{:50}, {}, {}".format(item_number, item_label, item_price))
103                                               , Light Saber, 256.128
>>> print(f"{item_number:50}, {item_label}, {item_price}")
103                                               , Light Saber, 256.128
Code language: PHP (php)

Now right adjust it:

>>> print("{:>50}, {}, {}".format(item_number, item_label, item_price))
                                               103, Light Saber, 256.128
>>> print(f"{item_number:>50}, {item_label}, {item_price}")
                                               103, Light Saber, 256.128
Code language: PHP (php)

Don’t like blank spaces? Lets set x as the fill character (instead of spaces) and 50 as the width for item number. Make it left adjusted.

>>> print("{:x<50}, {}, {}".format(item_number, item_label, item_price))
103xxxxxxxxxxxxxxxxxxxxxxxxxxxxxxxxxxxxxxxxxxxxxxx, Light Saber, 256.128
>>> print(f"{item_number:x<50}, {item_label}, {item_price}")
103xxxxxxxxxxxxxxxxxxxxxxxxxxxxxxxxxxxxxxxxxxxxxxx, Light Saber, 256.128
Code language: PHP (php)

Now make it right adjusted:

>>> print("{:x>50}, {}, {}".format(item_number, item_label, item_price))
xxxxxxxxxxxxxxxxxxxxxxxxxxxxxxxxxxxxxxxxxxxxxxx103, Light Saber, 256.128
>>> print(f"{item_number:x>50}, {item_label}, {item_price}")
xxxxxxxxxxxxxxxxxxxxxxxxxxxxxxxxxxxxxxxxxxxxxxx103, Light Saber, 256.128
Code language: PHP (php)

Here’s tweaking both the fill and the width:

>>> print("{:j<10}, {}, {}".format(item_number, item_label, item_price))
103jjjjjjj, Light Saber, 256.128
>>> print(f"{item_number:j<10}, {item_label}, {item_price}")
103jjjjjjj, Light Saber, 256.128
Code language: PHP (php)

What happens if you just give it a fill character and nothing else?

>>> print("{:x}, {}, {}".format(item_number, item_label, item_price))
Traceback (most recent call last):
  File "<stdin>", line 1, in <module>
ValueError: Unknown format code 'x' for object of type 'str'
>>> print(f"{item_number:j}, {item_label}, {item_price}")
Traceback (most recent call last):
  File "<stdin>", line 1, in <module>
ValueError: Unknown format code 'j' for object of type 'str'
Code language: JavaScript (javascript)

Woops! When you give a fill character, you must provide at least an alignment symbol (< or >).

>>> print("{:x<}, {}, {}".format(item_number, item_label, item_price))
103, Light Saber, 256.128
Code language: PHP (php)

However, you dont need to provide a width – if left out, the width will be whatever your content takes up. But wait, what’s the point of providing the adjustment character then? You’re right – there is really no point – it’s really just for the language parser to know what the heck x means. A nice example of a leaky abstraction.

In summary:

  • left / right adjustments are really only useful in the context of providing a fix width value
  • if you set a fill character, you can’t leave out the adjustment specification
  • the default fill is a space
  • the default adjustment is left
  • the default width is the width of the string

[sign]

Lets add signs to our item_number and item_price:

>>> print(f"{item_number:+}, {item_label}, {item_price:+}")
Traceback (most recent call last):
  File "<stdin>", line 1, in <module>
ValueError: Sign not allowed in string format specifier
Code language: JavaScript (javascript)

Woops! item_number and item_price are actually strings! You can only adds the sign symbol to numeric types. Lets re-declare those to be a number and float.

>>> item_number = 103
>>> item_price = 256.128
>>> print(f"{item_number:+}, {item_label}, {item_price:+}")
+103, Light Saber, +256.128
Code language: PHP (php)

Great! Here’s the output if we negated item_number:

>>> print(f"{-item_number:+}, {item_label}, {item_price:+}")
-103, Light Saber, +256.128
>>> print("{:+}, {}, {:+}".format(-item_number, item_label, item_price))
-103, Light Saber, +256.128
Code language: PHP (php)

What if we provide a negative sign?

>>> print(f"{-item_number:-}, {item_label}, {item_price:-}")
-103, Light Saber, 256.128
>>> print("{:-}, {}, {:-}".format(-item_number, item_label, item_price))
-103, Light Saber, 256.128
Code language: PHP (php)

So if you do a negative sign, you get the default formatting behavior which is that only negative numbers have signs.

What happens now if we tried to apply our previous fill and alignment stuff to these numbers?

>>> print(f"{item_number:<50+}, {item_label}, {item_price:+}")
Traceback (most recent call last):
  File "<stdin>", line 1, in <module>
ValueError: Unknown format code '+' for object of type 'int'
Code language: JavaScript (javascript)

You can’t! But you can still align and fill (without providing sign):

>>> print(f"{item_number:<10}, {item_label}, {item_price:+}")
103       , Light Saber, +256.128
Code language: PHP (php)

In summary:

  • you can only use signs on numeric types
  • you can’t use fill, alignment, and sign all at the same time. You can use fill and alignment on integers – which is probably sufficient for most use cases
  • by default if you don’t provide a sign, only negative numbers display with signs

[#]

Lets ignore the fill and align stuff moving forward – the rest of the specification (just like +) is specific to number types and, just like + will not work in conjunction with fill and align.

Add # to our signed formats:

>>> print("{:+#}, {}, {:+#}".format(-item_number, item_label, item_price))
-103, Light Saber, +256.128
Code language: PHP (php)

Uh, didn’t do anything. That’s because you didn’t specify the type of integer you want formatted (it defaults to decimal).

Lets make it output binary:

>>> print("{:+#b}, {}, {:+#}".format(-item_number, item_label, item_price))
-0b1100111, Light Saber, +256.128
Code language: PHP (php)

Hexadecimal:

>>> print("{:+#x}, {}, {:+#}".format(-item_number, item_label, item_price))
-0x67, Light Saber, +256.128
Code language: PHP (php)

We haven’t covered [type] yet, but we’ll get to that later in more detail. For now, just know that for # to be useful, you need to also supply an integer format type.

[0][width]

I’m addressing [0] with [with] because they actually relate:

When no explicit alignment is given, preceding the width field by a zero (‘0’) character enables sign-aware zero-padding for numeric types. This is equivalent to a fill character of ‘0’ with an alignment type of ‘=’.

Here’s printing with 0 and without the 0 prefix to width:

>>> print(f"{item_number:+09}, {item_label}, {item_price:+9}")
+00000103, Light Saber,  +256.128
>>> print("{:+09}, {}, {:+9}".format(-item_number, item_label, item_price))
-00000103, Light Saber,  +256.128
Code language: PHP (php)

As you can see, omitting the 0 will create a 9 character size output but without the 0 padding.

[grouping_option]

What if our item number was really big and we wanted some separators to make the magnitude more clear?

>>> print("{:+09_}, {}, {:+9}".format(-item_number, item_label, item_price))
-1_234_565_654, Light Saber,  +256.128
>>> print(f"{item_number:+09_}, {item_label}, {item_price:+9}")
+1_234_565_654, Light Saber,  +256.128
Code language: PHP (php)

With commas!

>>> print("{:+09,}, {}, {:+9}".format(-item_number, item_label, item_price))
-1,234,565,654, Light Saber,  +256.128
Code language: PHP (php)

[.precision]

Okay, now lets truncate our decimals for item_price into just a single precision:

>>> print("{:+09,}, {}, {:+9.1}".format(-item_number, item_label, item_price))
-1,234,565,654, Light Saber,    +3e+02
Code language: PHP (php)

Oh weird – it’s giving my value in scientific notation. Turns out, when you specify a precision, the default display that gets used is exponent notation. Yes, it’s weird. That said, you can change the display back to fixed point by specifying a specific fixed point type as you’ll see next.

[type]

Lets add f for our item_price float interpolation to make it fixed point display.

>>> print("{:+09,}, {}, {:+9.1f}".format(-item_number, item_label, item_price))
-1,234,565,654, Light Saber,    +256.1
Code language: PHP (php)

Hope that was helpful! I encourage you to go play around with the formatting options to really get familiar with it. It’s a very powerful formatting tool.